Showing posts with label baking. Show all posts

Wednesday, November 14, 2012

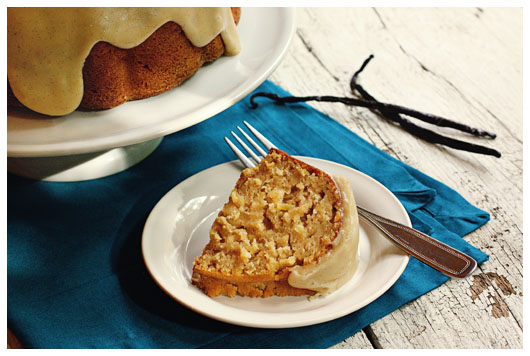
Apple Bundt Cake With a Twist!

With the holidays upon us I have been looking all over the place for the perfect recipe for our families thanksgiving get together! I always love pie, but its very traditional for thanksgiving and I wanted to try bringing something a bit different. I opted for a cake! I found this fabulous recipe online and wanted to share! :)

Apple Bundt with Brown-Butter Vanilla Bean Glaze

for the apple bundt:
1 T. butter and some flour for preparing the pan
4 medium apples – peeled, cored, & shredded (use the big holes on your grater), to make about 3-1/2 cups shredded apples – I used 2 Granny Smith, 1 Gala, and 1 McIntosh
1 T. fresh squeezed lemon juice
1-1/3 c. white sugar, divided
3 c. all-purpose flour
1 T. baking powder
1 T. cinnamon
1/2 tsp. mace
1/4 tsp. nutmeg
1 tsp. salt
1 c. brown sugar
1/2 c. vegetable oil
1/2 c. applesauce
4 large eggs
1/2 c. apple cider
2 tsp. vanilla
Preheat oven to 350°. Prepare a 12-cup bundt pan by smearing butter over every little nook and cranny of its interior. Then add some flour and tilt your pan so flour sticks to all of the buttery surface. Set pan aside.
Stir the shredded apple with lemon juice and 1/3 cup of the white sugar. Set aside.
In a medium bowl, whisk together the flour, baking powder, cinnamon, mace, nutmeg, and salt. Set aside.
In the bowl of a stand mixer, combine the remaining 1 cup white sugar, brown sugar, oil, applesauce, eggs, apple cider, and vanilla. Mix to combine. Then add the flour mixture and combine once again. Add the apples and mix until the apples are evenly distributed. Pour into prepared Bundt pan and bake for 1 hour, or until a toothpick comes out of the cake clean. Cool the cake in the pan for 10 minutes, then invert onto your serving platter.

**If you are going to top the cake with the glaze, start making the glaze immediately, while the cake is still warm!

Another option for serving this cake would be to finish it with a simple dusting of powdered sugar once it is cool. A dollop of slightly sweetened whipped cream or a scoop of vanilla bean ice cream would also be very good.

for the brown-butter vanilla bean glaze:
2 to 3 T. half and half
2 c. sifted powdered sugar
vanilla bean seeds scraped from 1/2 a vanilla bean (split bean lengthwise and scrape out seeds)
4 oz. butter
2 tsp. vanilla
First, pour 3 tablespoons of half and half into a small bowl and set aside. This is just to take the chill off, while you prepare the rest of the glaze.
In a medium mixing bowl, combine the sifted (don’t skip the sifting!) powdered sugar and vanilla bean seeds. Set aside.
In a large saucepan over medium-low heat, warm the butter until golden brown. It should smell delicious and toasty. If it smells burnt, you went too far! This should take about 6 to 8 minutes. Carefully pour browned butter into the powdered sugar and vanilla bean seeds, leaving the darkened butter sediment behind. Add 2 tablespoons of the half and half, then add the vanilla. Stir vigorously until smooth. You want the glaze to be somewhat thick, but easily pourable. If it seems too thick, add the remaining tablespoon of half and half.  
Pour the glaze over the cake while both the glaze and cake are still warm. The glaze cools quickly, so don’t delay! Let the glaze set. Then slice and enjoy!

Until next time, keep it clean! :)

Tuesday, November 6, 2012

Easy Weeknight (Dessert) Recipe: Pineapple Crumble

   I love a dessert that is easy to throw together with ingredients I already have on hand. Nothing pleases me more than transforming a few simple items into something extraordinarily delicious. The other night I found myself craving something sweet, but it being the day before grocery day, I was left with little options to choose from. So I grabbed a few ingredients from the pantry and fridge, mixed them up together and tossed it into the oven. The results were nothing short of amazing. ;)


   Simple Pineapple Crumble
 
You will need:
  • Pineapple, sliced and diced (I used one whole pineapple but in a pinch you could use canned, just drain the liquid first. Also, feel free to substitute ANY fruit in place of the pineapple. :))
  • 1-2 Teaspoons Cinnamon
  • 1 Cup + 2 Tablespoons Brown Sugar
  • 1 Cup Flour 
  • 1/4 Cup + 2-4 Teaspoons Butter, diced small
To Make:
 
   First you want to preheat your oven to 400 degrees Fahrenheit.  Next, "grease" your oven-safe dish or ramekins (I used two ramekins for single serving desserts) with butter. Toss your diced pineapple (or other fruit) with the 2 tbs brown sugar and 1 tsp cinnamon. Pour into the dish or separate equally  into each ramekin. For the topping, mix together equal parts brown sugar and flour. Then add the diced, cold butter and cinnamon. Using a fork or your hands, mash the butter into the dried mixture. You will want to do this until all of the topping has some butter and is crumbly. I used my hands and just "massaged" the butter into the dry ingredients until it was all incorporated. Spoon the topping over each ramekin or the entire baking dish. Top with a few teaspoons of sliced butter and bake for about 30-35 minutes, until topping is brown and the sides are bubbling. Let cool slightly and enjoy with vanilla ice cream!


   I hope you enjoy this weeks' recipe and let us know if you try it with any other fruit in the comments section below! Thank you and have a great week! Like always, keep it clean!


Tuesday, September 25, 2012

Pumpkin Cheesecake Muffins

   I love when I stumble upon a recipe that is so completely satisfying I can't help but share it as soon as my tongue gets a taste. This recipe definitely meets those standards. I am also enamored with fall, everything about it. From the cooler breeze to the changing colors in the trees, I adore it all. My absolute favorite thing about fall? It's pumpkin season. :) 
   
   Upon purchasing a small, organic "sugar pie" pumpkin from Whole Foods, I had a hard time deciding what to actually do with it. I flirted with the idea of making cupcakes with a nice cream cheese frosting. Or should I, upon the boyfriend's request, go all out and make a delicious (albeit time consuming) pumpkin cheesecake? With these ideas in mind, I scoured the internet in hopes to find the perfect fall treat. And boy, did I find it! The perfect combination of the two, I present to you:

Pumpkin Cheesecake Muffins
  
For the filling: 
  • 8 oz. cream cheese, softened
  • 1 cup powdered sugar
  • 2 tsps cinnamon 
  • 1 tsp almond extract (optional but delicious)
For the muffins: 
  • 3 cups all-purpose flour
  • 1 teaspoon ground cinnamon
  • 1 teaspoon ground nutmeg
  • 1 teaspoon ground cloves
  • 1 tablespoon plus 1 teaspoon pumpkin pie spice
  • 1 teaspoon salt
  • 1 teaspoon baking soda
  • 4 large eggs (or egg substitute - I used 4 chia/flaxseed "eggs")
  • 2 cups sugar
  • 2 cups pumpkin puree (you can purchase this pre-made or make your own - details below)
  • 1¼ cups grapeseed oil (or any oil you have on hand. I used a combination of grapeseed and coconut.) 
For the topping: 
  • ½ cup brown sugar
  • ½ cup flour
  • 1½ teaspoons ground cinnamon
  • 4 tablespoons cold unsalted butter, cubed
   If you're like me and prefer to avoid pre-processed foods, you might consider making your own pumpkin puree for this recipe. It's very simple to do and a small "sugar pie" pumpkin provided me with the exact amount I needed for this recipe. To make pumpkin puree, there's a variety of different ways you can go about it. All ways begin with you cutting the pumpkin in half, de-seeding it (Save for a later date! Pumpkin seeds are very nutritious and spectacular toasted with some cumin and chili powder.), and then chopping small and removing the skin. I chose the quickest method which involves placing the diced pumpkin into a pot of boiling water and letting it cook for about half an hour. Alternatively, you could roast the pumpkin or steam it. Both take a bit longer to do, however, and I was very impatient last night. ;) After you cook the pumpkin using whichever method you choose, you simply place the bits in a food processor or blender and let 'er rip! In seconds, you have freshly cooked pumpkin puree! (This also freezes exceptionally well if you end up with more than the needed 2 cups!)

   Now for the ACTUAL recipe. Preheat oven to 350 degrees. Combine your ingredients for the filling. Simply whisk together until nice and creamy, and then store in the fridge until ready to use. You'll want to make the topping next. To do so combine the dry ingredients and then add your cubes of butter. Then you'll want to use a fork to mash the butter into the dry mixture until it is crumbly. Also set this in the fridge until you're ready to assemble. Now you can make the muffin batter. Simply add all ingredients and mix until incorporated. (I used an electric hand mixer but with a little man power you can easily do this by hand.) You want to line a cupcake pan (or two if you have them!) and then fill the paper 3/4 of the way full with the muffin batter. Then you will add a dollop (about 1 tbs) of the cream cheese filling on top. Finally, sprinkle generously with the topping. Bake for about 20 minutes and then remove when a toothpick (or other sharp kitchen device) comes out clean. Let cool for as long as you can manage. I don't recommend eating directly out of the oven - the cream cheese filling is molten, trust me! 

   These muffins are the perfect fall treat and taste even better the next day for breakfast. I hope you enjoy this recipe and the beginning of your fall/holiday season! Until next time, stay hungry delicious clean!!!


Thursday, June 21, 2012

Make Apple Pie like a Pro !

     As you all of my friends and family know, I am very much a beginner in the kitchen. Especially when it comes to desserts!  So when my mom assigned dessert to me for a benefit that was hosted for my dad, I was in full panic mode as I didn’t want to let everyone down! Dessert, afterall, is the most important part of the meal.  Furthermore, I was instructed that store-bought items were not welcome – we all know I was already planning to cheat..
     After consulting Pinterest for some Apple Pie recipes, I came across this recipe for Apple Pie Baked in the Apple – I thought it was a nice blend of simple instructions and a gourmet look.  I’m a big fan of things that look more impressive than they actually are! Less work for me, but I look like I slaved in the kitchen and everyone is impressed, its a win win!


Step 1:
Cut off the top of 4 apples off and discard. Remove the inside of each apple with a spoon or melon baller very carefully, as to not puncture the peel. If you’re a skilled interior apple excavator, salvage as much as you can so you can use it for Step 2.  I, on the other hand, am not skilled so I just had to throw my interior apples away and chop up additional apples for filling.

Step 2: Remove skin from remaining apple(s) and slice very thinly. These apple pieces will give you the additional filling needed to fill the four apples you are baking. Mix sliced apples with sugars and cinnamon in a bowl. If you prefer more or less cinnamon make adjustments as desired. Same goes for the sugar. Scoop sliced apples into hollow apples.

Step 3:
Roll out pie crust and slice into 1/4 inch strips.  You can also add a strip of pastry inside the top of the apple almost like a liner to add a little more texture/sweetness to the pie. Cover the top of the apple in a lattice pattern with pie crust strips.
Step 4: Place apples in an 8×8 pan.  Add just enough water to the cover the bottom of the pan. Cover with foil and bake for 20-25 minutes. Remove foil and bake for an additional 20 minutes or until crust is golden brown and sliced apples are soft.
 
How neat does that look? The entire thing is edible and best served with ice cream if you ask me.I hope you take this recipe and use it to impress, as i have! From us at AZUMA Leasing, until next time - keep it clean! :)