Showing posts with label cooking. Show all posts

Thursday, January 30, 2014

How to Make the Perfect Easy Cup of Coffee


There are a lot of people out there who have reported knowing how to make the perfect cup of coffee, how to perfectly brew your espresso, how to avoid the Starbucks line. In my opinion, most of these people have over-complicated the matter with machinery and manifestos. Today we'll show you how to make a perfect cup to turn your morning from all right to great. And we'll do it for cheap. No buying crazy beans, contraptions or special filters.

Pick Your Beans
Last time you went to the supermarket, I'm willing to bet there were about 50 different bags of coffee to choose from. And so many promises, too. Dark Chocolate, French Vanilla, Italian imports, a few made-up Starbucks terms. And freeze-dried instant? Put that stuff down! You're better than that. You know how coffee smells so wonderful and you think it should taste that way too, only to find it's bland and watery and bitter? Yeah we're going to banish that disappointment. With the right bean, there's no worry. Look for:
  • Whole bean (not pre-ground or instant)
  • Breakfast blend if you like a lighter flavor or a little extra caffeine
  • Espresso or French Roast if you like stronger flavor or less caffeine
  • Fair-Trade/Organic if you can afford it (Costco has a great fair trade espresso for cheap)
Get Your Gear
I'm willing to bet that someone you know has a poor, neglected coffee grinder lying around. Grab it up. If not, you can find them for about $10-$15 brand new. Same goes for a French Press, at about the same price. Lastly you will need either a kettle or a pot to boil water in. Whatever you prefer.

via coffee.gurus.net

Keep It Clean
We like to say that a lot around here, but in this context it is truly vital. That bitterness and weird oily residue you see in your office coffee cup? That's because someone's not cleaning the electric coffee pot very well. Coffee beans are oily, and in time build up gunk and burn bitterness into every pot made. Don't just rinse off your stuff or throw it in the dishwasher. Scrub it out with a sponge and rinse it with vinegar from time to time. Especially if you got your gear second-hand. Your taste buds will thank you.


Brewing Your Cup
  1. Measure out enough water to fill your french press to the line plus a cup or two more, and put on the stove to boil.
  2. Put in just enough whole beans into your grinder for the pot. The amount varies depending on pot size and individual taste, but start with about 1/3 cup. I do about 2 small handfuls.
  3. You're looking for a "coarse" or "medium" grind for a french press. Fine grind is when the beans are the texture of soft sand, and is usually what you'll find pre-ground at the store. If you get that, you've gone too far. Medium grind looks like small gravel.
  4. Put your ground beans into your press.
  5. Once the water boils, take it off the heat for a few moments. Give it 10 seconds or so for the boiling to stop, then slowly pour the hot water in.
  6. Let the coffee steep for 5 minutes.
  7. Put the top on your french press and slowly press down on the plunger to move all the grounds to the bottom of the pot.
  8. Pour and enjoy!
I like to add a tablespoon or two of heavy cream to my coffee, but you can, of course, dress it however you like.

That's it! The simple, no-frills way to brew an amazing cup of coffee. Enjoy your joe, and until next time... Keep it Clean!

Wednesday, November 14, 2012

Apple Bundt Cake With a Twist!

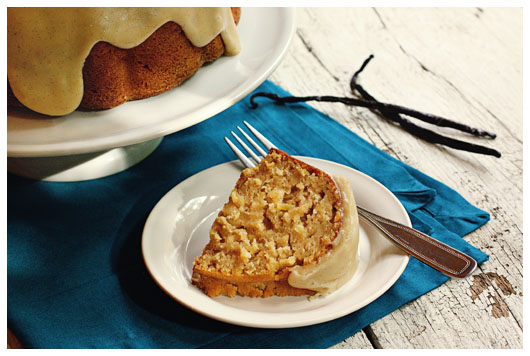
With the holidays upon us I have been looking all over the place for the perfect recipe for our families thanksgiving get together! I always love pie, but its very traditional for thanksgiving and I wanted to try bringing something a bit different. I opted for a cake! I found this fabulous recipe online and wanted to share! :)

Apple Bundt with Brown-Butter Vanilla Bean Glaze

for the apple bundt:
1 T. butter and some flour for preparing the pan
4 medium apples – peeled, cored, & shredded (use the big holes on your grater), to make about 3-1/2 cups shredded apples – I used 2 Granny Smith, 1 Gala, and 1 McIntosh
1 T. fresh squeezed lemon juice
1-1/3 c. white sugar, divided
3 c. all-purpose flour
1 T. baking powder
1 T. cinnamon
1/2 tsp. mace
1/4 tsp. nutmeg
1 tsp. salt
1 c. brown sugar
1/2 c. vegetable oil
1/2 c. applesauce
4 large eggs
1/2 c. apple cider
2 tsp. vanilla
Preheat oven to 350°. Prepare a 12-cup bundt pan by smearing butter over every little nook and cranny of its interior. Then add some flour and tilt your pan so flour sticks to all of the buttery surface. Set pan aside.
Stir the shredded apple with lemon juice and 1/3 cup of the white sugar. Set aside.
In a medium bowl, whisk together the flour, baking powder, cinnamon, mace, nutmeg, and salt. Set aside.
In the bowl of a stand mixer, combine the remaining 1 cup white sugar, brown sugar, oil, applesauce, eggs, apple cider, and vanilla. Mix to combine. Then add the flour mixture and combine once again. Add the apples and mix until the apples are evenly distributed. Pour into prepared Bundt pan and bake for 1 hour, or until a toothpick comes out of the cake clean. Cool the cake in the pan for 10 minutes, then invert onto your serving platter.

**If you are going to top the cake with the glaze, start making the glaze immediately, while the cake is still warm!

Another option for serving this cake would be to finish it with a simple dusting of powdered sugar once it is cool. A dollop of slightly sweetened whipped cream or a scoop of vanilla bean ice cream would also be very good.

for the brown-butter vanilla bean glaze:
2 to 3 T. half and half
2 c. sifted powdered sugar
vanilla bean seeds scraped from 1/2 a vanilla bean (split bean lengthwise and scrape out seeds)
4 oz. butter
2 tsp. vanilla
First, pour 3 tablespoons of half and half into a small bowl and set aside. This is just to take the chill off, while you prepare the rest of the glaze.
In a medium mixing bowl, combine the sifted (don’t skip the sifting!) powdered sugar and vanilla bean seeds. Set aside.

In a large saucepan over medium-low heat, warm the butter until golden brown. It should smell delicious and toasty. If it smells burnt, you went too far! This should take about 6 to 8 minutes. Carefully pour browned butter into the powdered sugar and vanilla bean seeds, leaving the darkened butter sediment behind. Add 2 tablespoons of the half and half, then add the vanilla. Stir vigorously until smooth. You want the glaze to be somewhat thick, but easily pourable. If it seems too thick, add the remaining tablespoon of half and half.  
Pour the glaze over the cake while both the glaze and cake are still warm. The glaze cools quickly, so don’t delay! Let the glaze set. Then slice and enjoy!

Until next time, keep it clean! :)

Thursday, August 9, 2012

Does this meal make me look healthy?

Lately I've been using an iPhone app called The Eatery. Every day you're supposed to take a picture of what you eat throughout the day, share it, and then strangers rate it on a scale from 1 to 100 on its healthfulness. The idea behind the app is that through peer pressure and unbiased outside opinion (you can have your friends rate your food too), you will begin to rethink things about each meal you make for yourself. When multiple people are rating your food, even if there are varying opinions, the average score you receive supposedly is often very close to the meal's actual overall health.

Taking pictures of your food at every meal is pretty quick and easy, but being on your phone regularly can sometimes be stressful and distracting. Also, not everyone has an iPhone! This was a fun experiment, though I don't know if I'm going to stick with the app in the long term. It might be useful to track my food during weeks where I am especially stressed out or tired so that I am forced to think about what I'm putting in my body. However, I do feel like I have learned a few things about what makes a meal feel healthy, look healthy, and on how I personally judge other people's food differently from how I judge my own choices. Here are a few things I've started doing regularly after using the app.

Use smaller portion sizes for denser meals.
There are some things I do not feel ashamed to share that I snack on mindlessly or stuff into my face while watching an explosion-filled action movie, like big bowls of salad or a bag of baby carrots. There are other meals that often come in standard large sizes that I might mindlessly eat when I shouldn't, especially when it's take out. If your evening burrito doesn't fit on your plate, you should cut it in half and repurpose it later for a nice breakfast or lunch. I find myself using smaller plates, around 8" in diameter, and make sure my food only fits on that. If after 30 minutes I'm still starving (though I'm usually not), I feel like it's OK to eat again. If it's a snack, like almonds, I grab a handful and put the container away.

There's always room for more greens!
Leafy greens are extremely healthy and filling, and they look beautiful on a plate. Pairing a meal with a salad or even mixing a salad in with your bowl adds a delicious and refreshing snap to your dish. Why not throw in some extra broccoli? Add some sauteed kale as a side dish. The more green the better.

Think differently about how you fill up the space on your plate.
I love pairing opposing flavors, and I've found that I get better ratings when there's more fresh fruits and veggies on my plate. At least half my plate will be fruits and vegetables. I've tried to use both of these things to my advantage. Grapes pair great with sour foods, bitter greens like collards pair great with salty foods. Mango, cherries, peaches and other super sweet stone fruits pair well with spicy foods. Use a vegetable peeler to peel a zucchini into thin noodle-like strips and eat it raw where you would normally have pasta. Instead of dipping chips in your guacamole, why not use cucumber slices or celery stalks?

Always use whole grains.
These days there is a plethora of choices for breads and grains. The closer to the whole original grain you can find, the easier it is to digest and the more protein- and nutrient-packed it is. Sprouted grain breads like Ezekiel are great for sandwiches and toast. Wasa flatbread crackers for snacks and dipping, buckwheat (soba) noodles instead of pasta, quinoa and brown rice instead of white rice. Gluten-free fare also often uses whole grains that you may never have tried before or heard of, like spelt and teff, that are protein-packed and super good for you. Gluten free bagels, crackers and biscuits are usually easily found at your regular grocer.

How often you do really treat yourself? And what do you call a "treat"?
I'm not saying never to eat ice cream or pizza again, but when you start tracking your food you have to face facts. Are you really only eating pizza on Friday nights? How many times a week do you grab a giant mocha latte from your favorite coffee shop? Completely withholding treats from yourself can make you feel like you're depriving yourself, which makes lots of people give up or derail on an all-or-nothing train of thought. However, sometimes we kid ourselves about what we say or think or know we should do versus what we are actually doing. Try counting your treats for a week and see if reality matches your mind. If you can't give it up, there are healthier substitutes for our old habits. If you love cream in your coffee, have cream! But use a good fat like coconut milk or coconut oil instead. If you find yourself eating ice cream all the time, try one of the many non-dairy and fruit-sweetened varieties available. Save the real cream for Sunday morning if you have to.


Life's a bowl full of cherries! Enjoy rethinking your meals and experimenting with how you put them together. Until next time, keep it clean!

Tuesday, May 15, 2012

Cooking with the Right Materials


The most important place to start making your home healthy is in the kitchen. We all know about healthy foods, but what about what you use to cook with? Here are a few tips on the best materials to use.

Cleaning and Disinfecting
Of course, clean surfaces are a must when cooking and preparing food. However, soaps and sprays can leave residue on dishes and cutting boards and can seep into your food while you're making it. For washing your dishes, use food-safe and natural soaps. Dr. Bronner's is a good example of a very simple natural soap that is safe for food contact. Borax and baking soda are also great when mixed as a powder for dishwashers. For cutting boards and countertops, spray first with vinegar and then again with hydrogen peroxide and wipe dry for a cleanser that is as effective as bleach at killing germs but completely pet and child safe.

Plastics, Teflon and Aluminum, Oh My!
Each of these materials, when heated, have extremely harmful side effects. That is, microwaving leftovers in a plastic container, making pancakes in a non-stick skillet and using baking powder with aluminum all increase your risk of cancer. The chemicals that each of these materials release when heated are absorbed into your body and stay there. Non-stick surfaces emit gases when heated that are harmful when inhaled and are known to be dangerous and even fatal to pets, especially pet birds. Aluminum is a known neurotoxin that has been linked to Alzheimer's and breast cancer. Bisphenol-A, or BPA, found in plastics is an endocrine disrupting toxin. This means that it mimics hormones naturally found in your body and throws them off balance, which can cause neurological problems, cancer and surprisingly, obesity. BPA is also often found in items like canned beans and shower curtains. Cook your canned foods the old fashioned way to save a little money and a lot of exposure.

The Right Materials
Sticking with natural materials is the surest way to eschew any potential chemicals in your food and home, and is also much better for the environment. Reuse spaghetti sauce and pickle jars for storage. Use ceramic or stoneware dishes, and if you microwave your food put a plate or a towel on top to prevent splatter instead of plastic wrap or plastic storage containers. Look for cast iron cookware (the iron that is released into your food from iron skillets is actually akin to taking an iron supplement) and use glass, ceramic or stoneware dishes for baking. Glass cooks evenly and similarly to aluminum, and cast iron is great for baked goods as it heats evenly to create breads that are crusty on the outside and soft on the inside. Non-stick surfaces seem helpful, but it is far better for you to eat a little healthy fat from greasing a pan (use olive, sesame, coconut or safflower oils) than to be exposed to a chemical. And remember to always use new grease when cooking. Reusing and reheating fats can break them down and turn them into hydrogenated and trans fats, which are very bad for your heart and your waistline.

Updating your kitchen and avoiding harmful materials is easy and one of the best steps you can take to a healthy happy home. With these simple basic tips, you'll be well on your way to a simpler and healthier meal time. Until next time!